This post shows step-by-step guide to compile and download the Contiki 2.7 demo for CC2538DK on Microsoft Windows operating system.
Installing Prerequisite Software
There are two software tools which are needed to compile the Contiki software: make tool and ARM GNU Compiler toolchain.
For installing the make tool, download and install Cygwin. It is of course necessary to choose the correct installer depending on the computer machine architecture (32/64 bit). Installing Cygwin is quite intuitive, however since per default the installation for “make” tool is skipped, it is necessary to manually activate the make tool installation.
After executing the Cygwin installer and choosing the server (the closer of the server geographically, the better/the faster installation should be), right in the “Select Package” windows put “make” in the upper left search text field and the under “Devel” folder, you need to click the “make” so it won’t be skipped. This is shown as follows:
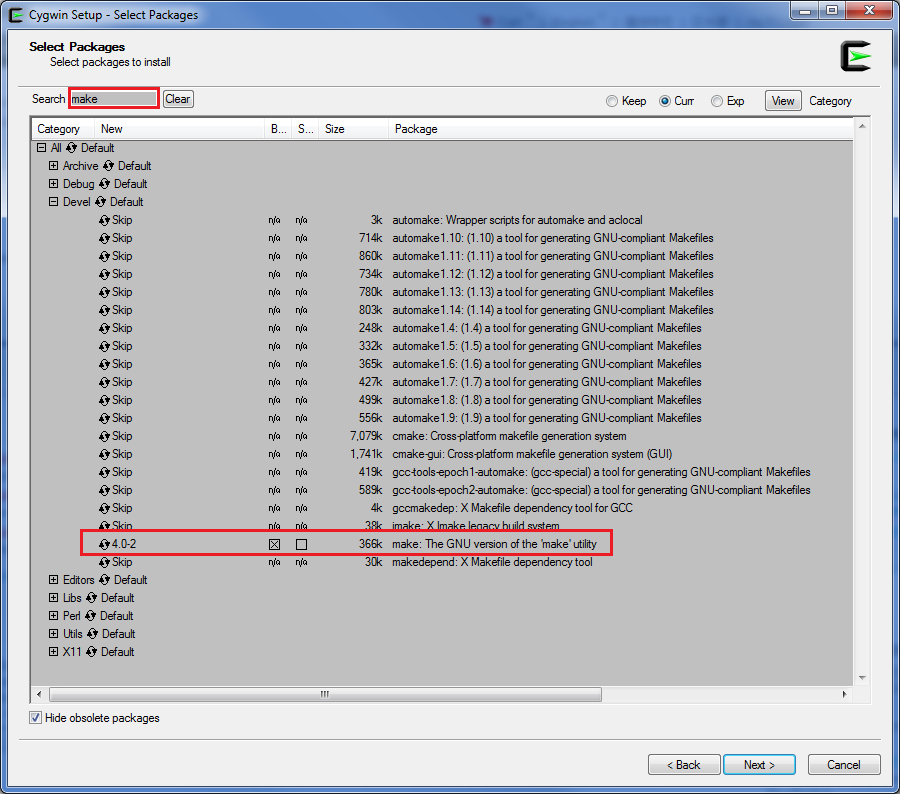
As can be seen above, the installed make sofware has the 4.0-2 revision number. When finishing Cygwin installation, don’t forget to install “Cygwin Terminal” on your desktop – it will be easier to be accessed later on. The Cygwin installation consumes around 100 MB of my hard disk, and the files are installed under C:\cygwin64 (I am using 64 bit Windows 7 Laptop).
Next step is to install ARM GNU Compiler toolchain. There are some options on the internet for this (just google “arm gcc windows”), but the one taken for this guide is the one from this link. At the moment of writing, the latest (and used) installer version is gcc-arm-none-eabi-4_8-2013q4-20131204-win32.exe. Compilation should be easy and intuitive, and when it finishes it will put the toolchain under the folder path “C:\Program Files (x86)\GNU Tools ARM Embedded\4.8 2013q4”.
Final step would be to add the path of the installed ARM GNU compiler binaries to PATH environment variable in the Cygwin terminal. Open Cygwin terminal and type:
$ export PATH=/cygdrive/c/Program\ Files\ \(x86\)/GNU Tools ARM Embedded/4.8 2013q4/bin/:$PATH
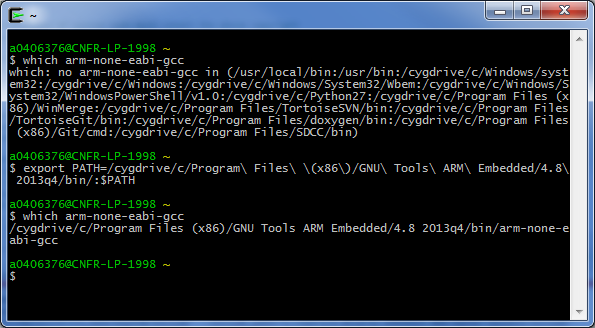
As can be seen in the Cygwin terminal screenshot above, at the beginning, the arm-none-eabi-gcc is not to be found in any folder listed in PATH. After executing the command line as described above, then the bash shell can then find the folder where arm-none-eabi-gcc.exe executable is located.
It might be also helpful it the step above for adding the PATH variable doesn’t need to be done every time starting a new Cygwin terminal session. In this case, add the line instead into the .bashrc file which can be found under the cygwin installation directory: C:\cygwin64\home\.bashrc.
One last software which is needed to be installed is the SmartRF Flash Programmer which is used to flash/download the generated binary output to the CC2538DK. For the CC2538DK, install the SmartRF Flash Programmer v2 (FLASH-PROGRAMMER-2). This will also install the necessary windows drivers for the on-board XDS100v3 programmer and the UART back-channel.
Compiling Contiki
Download Contiki 2.7 from the following link. Extract the ZIP file somewhere in the hard driver, for this guide, e.g. under C:\Work\contiki-2.7.
Before we start with the compilation, it is necessary to modify one of the source file for CC2538 support. I had hard time to make the examples running and after 2-3 days debugging, finally I found out that it is necessary to modify the random_init() function which can be found under contiki-2.7/cpu/cc2538/dev/random.c file. Add one assembly inline NOP instruction as shown below:
void
random_init(unsigned short seed)
{
  . . . . . .

  /* Enable clock for the RF Core */
  REG(SYS_CTRL_RCGCRFC) = 1;

  asm("nop");

  /* Infinite RX - FRMCTRL0[3:2] = 10
   * This will mess with radio operation - see note above */
  REG(RFCORE_XREG_FRMCTRL0) = 0x00000008;

  /* Turn RF on */
  CC2538_RF_CSP_ISRXON();

  /*
   * Wait until "the chip has been in RX long enough for the transients to
   * have died out. A convenient way to do this is to wait for the RSSI-valid
   * signal to go high."
   */
  while(!(REG(RFCORE_XREG_RSSISTAT) & RFCORE_XREG_RSSISTAT_RSSI_VALID));

  . . . . . .
}
From my observation, without the NOP instruction between the enabling of RF Core clock (setting SYS_CTRL_RCGRFC to 1) and the setting of radio operation to infinite RX (setting RFCORE_XREG_FRMCTRL0 to 0x8), the code will get stuck on the while loop afterwards and the random_init() function will never finish.
Now we will start with the simplest hello-world example. Navigate to the examples\cc2538dk directory in the Cygwin terminal using the cd command (C: drive is located under /cygdrive/c/) and then type the following command to compile the hello-world example for CC2538DK:
$ make TARGET=cc2538dk all

As shown by the screenshot above, the compilation shall succeed and the hello-world.bin shall be the output generated binary file. In the screenshot above, I added “time” command before the make just to measure the compilation time. Indeed as shown above, the compilation can take a while at the beginning (more than 11min).
Launching The Demo
Open the installed SmartRF Flash Programmer v2, and connect the CC2538DK to the PC via USB cable. Make sure that the kit is USB powered, the CC2538EM is powered via EM, and jumper for enabling the UART back-channel is connected (see the SmartRF06 User’s Guide).
Click the “Refresh” button of the “Connected devices” and select the CC2538 under XDS100v3 board. Under the “Main” tab, browse for the generated hello-world.bin output file and under “Actions” check “Erase” for “All (Mass erase)” and “Program” for “Entire source file”. Then click the right arrow/play button as shown follow:

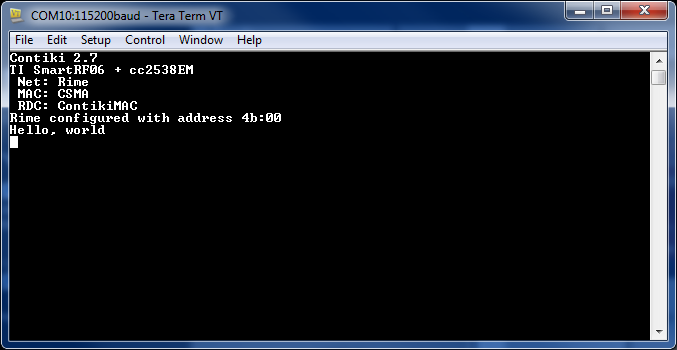
After the programming succeeds, open a hyper-terminal like program on the PC (i am using TeraTerm) and connect to “USB Serial Port” which is the UART back-channel of the SmartRF06EB board. Set the UART setting to 115200 8N1, and then push the reset button which is located left to the LCD on the SmartRF06EB. The LED2, LED3, and LED4 on the SmartRF06EB shall be blinked one after another, and the hyper-terminal like program on the PC shall catch the UART output of the Contiki’s hello-world program such as follows:
The same compilation steps can be also done for the specific CC2538DK demo which can be found under contiki-2.7/examples/cc2538dk. Navigate in the cygwin terminal to the folder and execute “make” command without any parameter. This will generate two output files: cc2538-demo.bin and timer-test.bin
For more information regarding the Contiki and CC2538DK, open the README.md file under contiki-2.7/platform/cc2538dk, and also refer to my next post on running the CC2538DK Demo.
Pingback: window下Cygwin编译Contiki for ARM | 咕噜的wordpress
Thanks for this first tutorial.
Some minor issues that happened to me:
avoid spaces on the path vars. I never got this to work:
“export PATH=/cygdrive/c/Program\ Files\ \(x86\)/GNU Tools ARM Embedded/4.8 2013q4/bin/:$PATH”
so i had to install the Toolchain into a different path with all the spaces removed.
Thanks again for your good work.
Hi, could you tell me how to change the rime address of the node? In this example the rime address is not equal to the 2 LSB of the hardcoded IEEE address. Thanks